Podcasts have been growing in popularity over the last couple of years, although they've been around for quite a while now.
In fact, the name “podcast” is almost a bit dated, a relic from the past when everyone had an iPod, but smartphones weren't something most people used.
It turns out that audio can be a great way to present content.
It's convenient for people who want something to listen to during their workouts, or in the car during their commute to work.
There are plenty of situations where audio makes a lot more sense than text or video.
That's not to downplay text blogs and video, of course.
In fact, there's a pretty easy process you can use to produce a blog post, a video, and a podcast, all from just one content idea.
Presenting something in three different online media can greatly expand your reach, as well as allowing you to take advantage of each individual medium's unique capabilities.
In a recent article from Social Media Examiner, the author presents a simple four step process that he uses to create videos and podcasts.
The great thing is that you can do this with minimal equipment, and it's not something where you're going to need to spend a ton of money.
It's accessible even to small niche bloggers and brand new businesses with minimal budgets.
#1: Record Your Video and Audio
Some people prefer to record first and write later. The act of talking through a concept, explaining it to others through the mic, often leads to a clear, well-thought-out article. If you prefer, you can write first and record later. In a similar way, writing out the idea can refine it in your head and lead to a tight, actionable recording.
To record your video, you can use a digital SLR or a decent smartphone. Consider creating a video recording studio so your camera is always set up and ready to go.
The really important part is to record good sound. It’s worth the money to invest in a quality mic like the Shure SM58. A lavalier mic like the ATR3350iS (a bit noisy, but good value) can be a good option too. You can plug the ATR3350iS directly into a DSLR camera as long as it has an external microphone port.
#2: Edit Your Video and Audio
After you record your video, you’re ready to start the editing process. First, set up a production template in the video editing software of your choice. I have a blank template set up in Adobe Premiere, which saves me a lot of time. At $20 per month, Adobe Premiere allows a time-saving workflow that’s worth every penny. You can also use iMovie or Movie Maker.
#3: Export and Publish Your Video and Audio Files
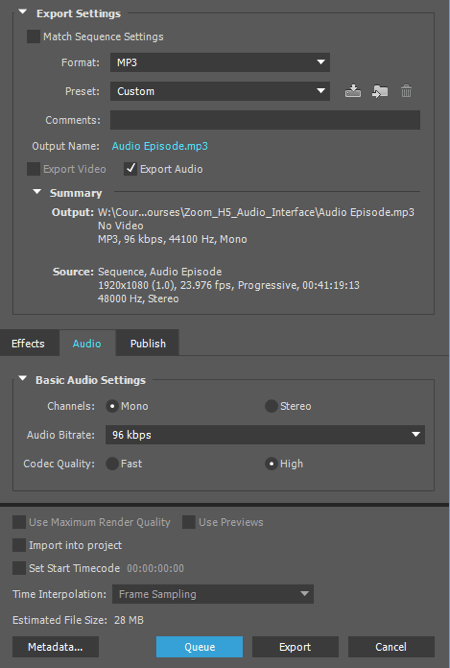
The final step is to export your media. Premiere lets you export the audio sequence as an MP3 file. I set the bit rate to 96 kbps and ensure it’s a mono file.
[image source: Social Media Examiner]
Export your audio as an MP3 file in Adobe Premiere.
For the videos, I use the standard Vimeo 720p export settings with one addition: the -19LUFS loudness normalization. This setting ensures the videos are at the right export volume.
Now you’re ready to publish these media files to your podcast and video channels.
#4: Compose and Publish Your Blog Post
When you’re finished editing and exporting your audio and video files, use your bullet-point plan as a guide for writing your blog post. The writing process should be easier because you have an outline and the experience of talking through the episode.
You’ll also want to embed your audio and video inside the blog post. WordPress allows you to embed YouTube video really easily. And for the Audio, there’s a great tool called Powerpress that lets you integrate audio into your site to create a podcast. Here’s a guide to setting up Powerpress if you need it!
The blog post is your reach, the video builds popularity (encourage readers to click play on the video, as they’re browsing the post), and the podcast nurtures trust (include a player on the post and encourage them to subscribe!).
For more details about exactly how to execute each step for your own content marketing efforts, check out the full post over at Social Media Examiner.
CHALLENGE Yourself to Profit!
Free Download: Build Your Profit-Generating Online Business With This Free Blueprint
Sign Up, follow the easy steps and You'll get the tactics, strategies & techniques needed to create your online profit stream. It's free!


